
Make your own sewist’s notebook! (Free printable templates!)
Update: I have collected all the Sewist’s notebook related templates and posts on one page. There you can find also more templates the number of which will grow in the future!
I have been working with something special for you, my dear readers! I often get ideas of future sewing projects while I’m sitting on a bus or in bed just falling asleep. I have started wishing there was a way to quickly take notes or make a sketch for not to forget the idea. There are some amazing croquis pads for designers available but after browsing the selection available online, I was convinced that none of the options were good for me.
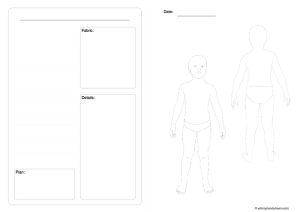
I mainly sew for myself and my kids, so I want both kid’s and woman’s templates in the same sketch book. I also wanted to leave room for notes about the fabrics and sewing patterns. There is also my daughter S, who loves to design clothes and wanted her own fashion sketchpad. So, I did some work with Photoshop and here are my templates for you to download for free. I made four different pages: One with woman’s body template, two with a child’s body template both with and without notes section and a index/notes template that you can use to index your notebook or to add handy lists of sewing patterns to try or fabric shopping lists.


All the templates are free for non-commercial use. If you like them, leave a comment and/or subscribe to my blog!
Anyway… How to use these templates. They all are A4 size so, you can simply print them out and put them in a binder. I recommend printing the same template on both sides of a paper. If you do that, you can also use an A5 binder if you cut the pages in half. I, however, wanted to make some notebooks for both me and S. If you want to do the same, you can follow the tutorials below.


DIY softcover notebook
This is the easier option. Print out the pages you want on A4 paper and fold them along the middle. Cut the covers from colourful cardboards using A4 page as a template.

I do not own a big stapler but I do have a small stable gun and Ikea potholders. I placed the opened notebook on the Ikea cork potholder and stapled through the back of the notebook.

With a little prying the notebook came loose from the potholder and I used pliers to turn the staple ends down.
And you have a custom made soft cover notebook!
DIY hardcover notebook
Ok. Now the hard cover notebook is a little trickier to do, but it is more durable and you can add more pages to it. First print out the pages (double sided). Sort them into bunches of eight sheets and fold them in half. You are going to sew each of the bunches together and connect the bunches to each other.

I used buttonhole silk as a thread. Try to find a soft thread if possible. The normal polyester sewing thread may cut the paper a bit, but you can use it if that’s what you have. Perforate the backs with a sewing needle (you can use a cork potholder, ironing board or similar underneath). Make an even number of holes. Now baste the bunches together and connect the bunches at the ends by making little knots with your thread and needle.

Now you need a piece of scrap fabric. Cut the fabric in size that is a little longer than the back of the notebook you are making and about 6 cm wider. Fold the ends. It is useful to press the bunches of paper together and I am using a pair of rulers and some clips to help keep the bunches in a tight stack.

Add all-purpose glue (I’m using Eri-Keeper) and glue the pages to the fabric. Leave to dry in vertical position like here:

Cut sturdy cardboard into covers that are a few millimetres wider and longer than the folded-up pages. Measure the thickness of your page-stack and add 2 x the thickness of the cardboard to determine the thickness of the back of the book.

Cut fabric or paper to use as a cover. Make it about 2 inches wider and longer than the opened up book will be:

I use spray glue to glue the cardboard cover pieces onto the fabric.With all-purpose glue the fabric/paper tends to stretch and form unsightly wrinkles. Remember to shake the spray glue properly and spread the glue evenly on both the fabric and the cardboard pieces. Use all-purpose glue to glue the edges of the fabric/paper to the inside of the book cover.

Now it is time to insert the pages. Spread some all-purpose glue in the middle of the back and the edges of the cover. (I mean spread it. Do not leave it like it is on the picture!)

Glue the pages on. Leave to dry for a few minutes. While the glue is drying…

… cut some nice scrapbooking cardboard to A4 size (or just a few millimetres wider. It depends on your cover size). Spread some all-purpose glue and glue the cardboard to cover the fabric edges.

Leave to dry for a bit.

After about half an hour (depends a bit how much glue you used) take your book and open and close it. See that it works as a notebook. Then add some weight on top of it (use some plastic on both sides of the notebook to prevent your notebook being glued to your weights. Leave it there overnight.

In the morning you should have a nice notebook that you can fill with your sewing plans!

Here is my first sketch:

S made hers, too:

Here is one way you can use the index pages. I have inserted a bunch of these in the beginning of the book for all my important notes.

Do you have any other ideas how to use this notebook? Feel free to leave a comment below! I hope you enjoyed these templates and the tutorials and if you like my blog, remember to subscribe to get notification every time I post something new! Happy sewing (and sketching)!
Share this:


13 Comments
Life of Janine
Juska, this is a wonderful project. Thank you so much for sharing! I love having notebooks for specific projects but never considered making my own.
Mary
Thanks for sharing such a great project and for taking the time to write such detailed instructions. The notebooks are lovely and useful.
kk
Thanks! Sorry about the grayish photos. I couldn’t wait with the project and took the photos in the evening.
Sew Sarah Smith
This is fantastic – thank you!
sewing à la carte
What a kind offer. Thank you for sharing.
Nokedli Design
what a great idea! thank you!
Ann (SewBabyNews)
Thank you, this is great! I will use this for my sewing students to keep track of their projects!
Pingback:
BarbiMama
Hy, this is a great idea. But i’m not that good at drawing. I’m wondering is there an ‘e-‘ version…I mean if there is an app that i could use to do the same…to match up patterns of fabric that i have at home or thinking of buying, that i could see if they match? Hope You understand what i’m asking…Thank You!
kk
I have an app called Cora on my iPhone. I store images and details on my fabrics on it. Of course, digital images may change the colours a bit, so it may not be perfect for the matching purposes. I usually carry a little samples of fabric on my purse, if I really need to find a good match.
Sartenada
You are very handy! You could also do these which my wife made:
3D Origami
Happy weekend!
kk
Thanks! Origami is something my daughter is into right now. Our home is filling with colourful origami birds she makes!
Sartenada
Wow, what a concidence!