Trying out hatmaking in Edwardian style
A few weeks ago, I watched the Edwardian hat tutorial video by Angela Clayton. I was inspired as the hatmaking process didn’t look too complicated and I didn’t really need to go and buy any materials. I had some jewellery wire, stiff interfacing and lots of fabric scraps that were just waiting to be used. So, I made my first hat!
Making the hat base

I started by estimating the size of my hat with a simple cardboard model. Then, I cut all the pieces out of some very stiff fusible interfacing. I fused the interfacing pieces onto white linen fabric, cut them out and added jewellery wire that I zigzagged onto edges of all the pieces.

Then I covered the pieces with linen fabric. There was a lot of hand-sewing involved.

For the underside of the rim, I decided to add pleated cotton. This is what Angela also did on her video. I trimmed away all the extra fabric and finished the edge of the rim with some white satin bias tape. Then I joined the pieces together by hand. I now had a very plain hat like this:

Adding decorations
Now the fun part started. I started adding embellishments. To be honest, I have no idea how the milliners normally do this but I just went with what felt right to me. First I added four layers of tulle. To create even more height, I stuffed the top of the hat with a bunch of tulle scraps. Then I draped a piece of silk on top of the tulle layer:

I have had this very stiff nylon lace and have not found a way to use it before. However, on the rim of the hat the stiffness was actually helpful. I pleated the lace and pinned it around the outer rim. Then I sewed it on carefully by hand.


Obviously, more decoration was needed, so I draped half of the crown with spotty net and added a little bow.


The opening in the hat was actually bigger than my head circumference. This was actually common in Edwardian hats that often were huge. However, there were many different tricks on how to keep the hats on. One trick was to sew on a casing inside the crown. A cord was then inserted into the casing and the hat size could be then adjusted by pulling the cord tighter.
Sewing on artificial flowers
An Edwardian hat obviously needs flowers! I didn’t have anything suitable but short browsing through local fleamarket site ended up someone coming by and handing out all these pretties to me. They were perfect for hatmaking:

I remember seeing this idea on an actual period sewing magazine: To fix the flowers on hats, it’s much easier to make a little support for them. This way you can arrange the flowers onto the support and then just sew the finished decorative piece onto the hat. I had some interfacing pieces leftover and those were great for this purpose. I made some holes in them, just to help sewing on the flowers (although this ended up being unnecessary.) and sewed pieces of linen to cover them. As the flowers will cover these completely, I just pinked the edges with pinking shears.


I designed the arrangement and sewed the flowers on. I realised that I could just sew the flowers onto the linen, so I didn’t need the holes I had made to the interfacing.

Then I just sewed the flower arrangements onto the hat and I was done!
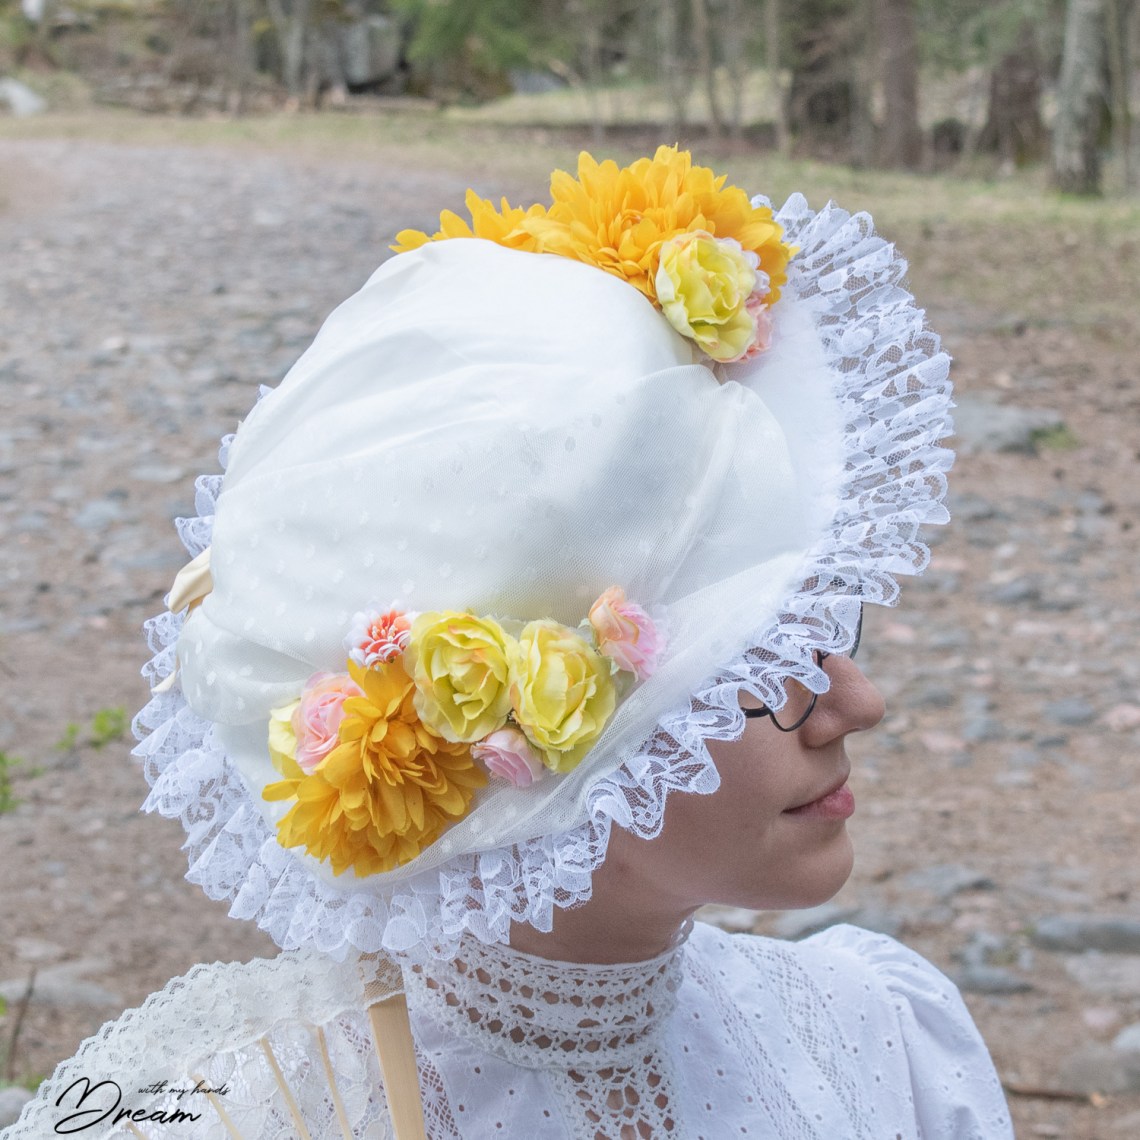
The finished hat
I’m not actually super excited about the finished hat. First, it is so white that it washes my face of all the colour. Then the lace at the rim looks a bit odd to me. In any case, I feel that I should have that gigantic Gibson Girl hair to wear something like this! But, I’m happy that I made this just for the hatmaking experience.


I’m not probably going to wear this hat but I will definitely try hatmaking in the future. I’m going to get materials better suited for hats rather than just trying to scavenge leftover scraps. Also, I need to consider, what shape of hat would best suit my face and hair.
More experimental sewing and crafting in coming soon so do subscribe so that you get notified when my next post appears! Happy sewing!
Katja
Share this:


4 Comments
Kristiina Sädevuo
Sä oot sitt kekseliäs ja oikeesti taitava. Ihailen.
kk
Kiitos! Sitä vain on pakko näpertää koko ajan jotain!
Tess
I think it looks pretty on you. Perhaps you could reline the inside with a color that will flatter your complexion? Pure, bright white is not a good idea close to most people’s face, so don’t feel bad about that. 😉 Just know you look lovely. We’re our own harshest critics!
Pingback: