
Goldfish circus costume
My daughter goes to circus classes every week and their group has a spring performance coming next Sunday. The theme for the performance was “Underwater animals” and I was inspired! For once I could make something completely different and fun!
Materials for the circus costume
I went for a fabric haul at FlexTex to get all the fabrics for this costume. I bought 0.5 m of dark orange chiffon, 0,5 m of Holo Zitto Gold Sunrise lycra, 0.2 m Mermaid Gold Holo Coral print lycra and 0.7 m of shiny dark orange lycra.
Previously I wrote about how I pleated the chiffon at home using plissé technique. Do check it out!
I had gold sewing thread and lots of different elastics in storage for the appliqué and the leotard edges, so that wasn’t a problem. However, I also wanted to have some accessories, I I went to Hobby Point in Helsinki and got some fabric dyes and molding clays.
The leotard
I have had the pattern for ballet leotard made by Mountain Ash designs for years since I once had to make a dance costume for S. Now I printed out the pdf pattern once again. This time I did not want to have any sleeves but the pattern worked well even without.
I traced both the front and back on some pattern paper and drew my appliqué design on it. I did not want anything too complicated, so I chose a wavy stripe across the front and the back. The stripe also made it possible to hide the seam between the top part of the leotard (yellow Zitto) and the orange bottom.
I sewed the top and the bottom together flat, using honeycomb stitch to make the seam both flat and stretchy. Then I pinned the appliqué on the top and used some paper glue to keep the edges in place. I used the walking foot and practiced my zigzag with a scrap fabric to adjust the thread tension. With these preparations I was able to sew the appliqué on nicely, without stretching or ugly puckering. The gold thread added some extra glam to the appliqué!
After the appliqué the rest of the leotard was very quick to asseble. I did lower the armholes about 1 cm, since I had removed the sleeves. My coverstitch didn’t seem to like the the combination of lycra and the elastic band and skipped a few stitches. The next time I must try to switch into different kinds of needles, since otherwise my coverstitch doesn’t skip stitches. However, I had the same problem with my sewing machine when I first tried sewing with lycra and I only solved it by switching into “Stretch” needles.
To make the sleeves I cut approximately fin shaped pieces out of my pleated chiffon and I finished the hems using my serger’s rolled hem. I noticed that the chiffon was still prone to unraveling so I sealed the corners using some clear nail polish. (I have misplaced my Fray Check!) However, before I could add them on to the leotard, I had to do some painting!
Fabric dye
I dyed the skirt pieces a bit redder at the hem by dabbing it with a sponge that was dabbled into some fabric dye. I used Pebeo fabric paint that works not only for natural fibers but synthetics, too. To prevent fraying and to add some sparkle, I added a tiny bit of glittering gold at the hem. I did the same thing with the sleeves.

I used some old overhead projector plastic slides to make a template and used that to dab some gold fish scales on to the leotard front. The gold fabric paint didn’t stick very well to the lycra, so I added more colour with a paintbrush.
I ironed the fabrics for five minutes to fix the fabric paint. This was a bit interesting since I wanted to be careful with the pleats. It was quite a job to pin the pleats onto my ironing board but better safe than sorry!
The skirt
I made a waistband out of orange lycra. I couldn’t just fasten the chiffon to the waistband since the chiffon wasn’t stretchy. What I came up with was that I made the skirt out of four flaps. The ones at the front and back are stretchy lycra. They are rounded at the hem and finished with the serger rolled hem.
I added the chiffon skirt bits to the both sides. I had to add some pleats to make them fit, which was fine for me and added a bit extra swing to the skirt.
Wristlets and anklets
I must thank for S for this idea. She was playing with leftover fabric and wrapped some around her wrist. She came to show me and explained how nice it would be to have something like that made for the costume. I thought that the idea was brilliant. I developed it further by adding little fins made out of the tiny leftover chiffon fragments. (That chiffon was used well!) I made not only wristlets but anklets, too.
Accessories
I got this idea of using Foam Clay and Silk Clay to make hair accessories, because they are soft, lightweight and mess free, although Foam Clay is a bit stickier. (I am an Amazon associate and if you are interested in these products, consider supporting my blog by clicking through my links! It doesn’t cost you anything extra!)
The Foam Clay worked nicely with some metal wire to make corals. I left some wire loops outside to help to fasten the coral pieces on hair with some bobby pins.

Silk Clay is just amazing stuff and I can recommend it warmly to all families with artsy kids! It is completely mess free, it doesn’t stick to table or carpet or stain hands. It even sort of smells nice! Silk Clay is easy and soft to mould and the fabrics don’t stain each other unless you really work on mixing them. All the things you make dry out in air, so there is no need for oven hardening.

Ok. Despite my honest opinion as a mother, I have never used Silk Clay by myself but just watched the cute monsters, play foods and other things my kids make out of it. This time even I got to play with it. My daughter S used some ready made moulds to shape shells and star fish. I made little star fish to make matching earrings.

After the things we made were dried overnight I glued a starfish and a shell to some hair clips and the little star fish to ear studs.
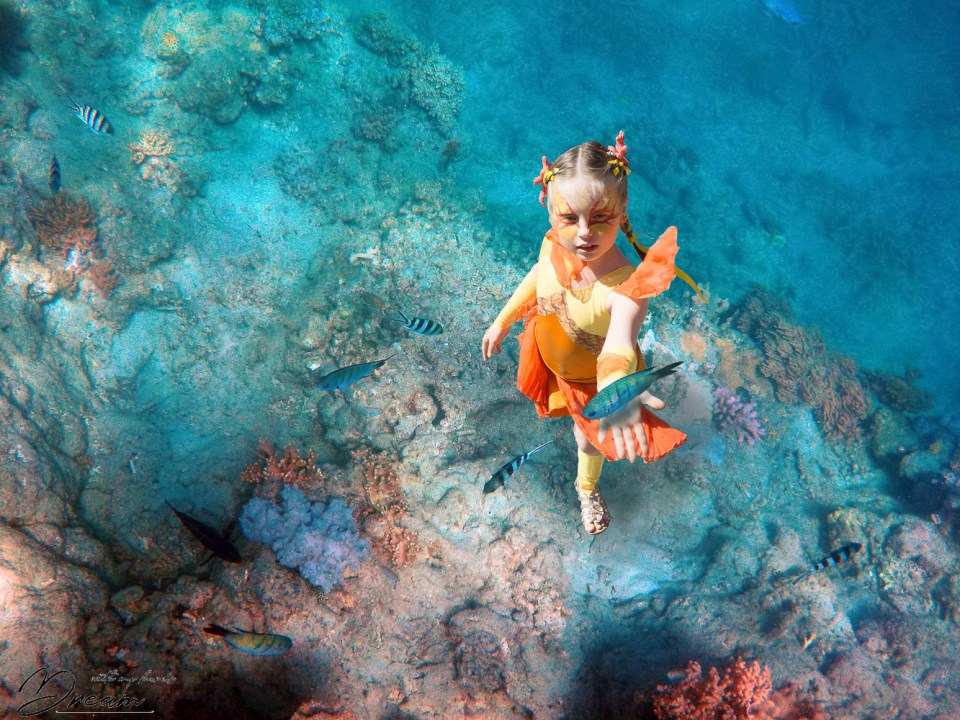
The finished outfit
S loves the new circus costume. Today we practiced making fish themed face paint and it was a perfect time to take some photos! On my opinion S looks like a some sort of super hero that turns into a fish! I then had even more fun changing the photo backgrounds into something more suitable with Photoshop!

I did not need to bribe S to be in the pictures but finally I promised her some ice cream if she could just slow down a bit so that the camera had time to register her imaginative poses!

Above, you can see the leotard back. Due to the elasticated neckline there is no need for a zipper.
I hope you liked this post and that inspired you to use your imagination to make something unique!
Do share this blog post in the social media, if you liked it and remember to subscribe to get notified on the following posts!
Happy sewing!
Katja
Share this:


5 Comments
Sue Morse
How wonderful for S that she has such a creative mother. As a former primary school teacher I do admire your willingness to work on such a project with your daughter. She’ll probably keep what you did together as one of her favorite memories.
kk
My daughter is a maker! Se already has her own sewing machine and makes things not only for herself but also for her friends. I sometimes feel sorry that I have to curb her more ambitious projects that I believe would lead to too much frustration!
Melody Srygley
AWESOME! An overused word…but totally fitting here. What a joy for mother & daughter!
Susan
Wow — absolutely beautiful! Such a creative and effective use of materials.
Jo
That’s a lovely costume, I’m sure your daughter was delighted! Great pictures too!