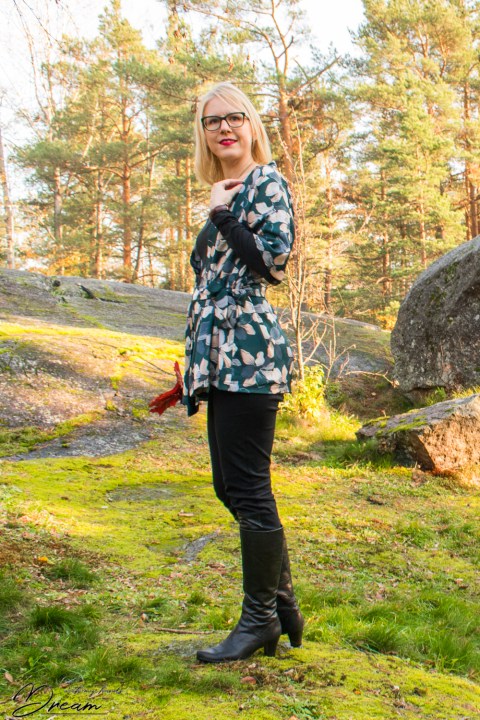
Sew Over It Kimono
I made this Kimono out of some lovely satin I found. Sometimes it is just nice to have something dressy to throw on your pyjamas or just wear as a stylish jacket. I have the book Sew Over It vintage by Lisa Comfort and it has a lovely 1930s inspired Kimono dressing gown that I wanted to make.
The book
Sew Over It Vintage is a couple of years old but as it is concentrated on vintage style, it’s never really outdated. The book doesn’t have a pattern sheet but instead, it shows how to draft your own patterns. This actually put me off for a while. Firstly, because I wanted to make more complicated garments with plenty of details and secondly because I was unsure about my pattern drafting capabilities despite the clear instructions.
However, now I have started to get more and more involved with pattern making. First, I just modified little details, changed a collar or took in a waist that was too small. Then I moved into combining different patterns that had details I wanted in the same garment. Now I am starting to think that I could make even nicer garments if I made my patterns. So, this book is a nice thing for a person like me, who loves vintage style and is interested in pattern drafting.
There is one pattern that is basically just the Rosie skirt that has a separate pattern available. Then there are several boxy tops that are based on the same block that you will need to draft to your measurements. There are also a pattern for French knickers, a capelet and a couple of skirts.
However, if pattern drafting isn’t for you, there are also tips on how to turn modern items into more vintage-y ones by adding faux-fur cuffs and collars or rhinestones, to name but a few.
What I find a bit silly, in the book are the two projects, where a RTW cardigan or a top is sewn onto a skirt to make a dress. What is the point of that? Before you could wear the cardigan/top with multiple outfits, including the skirt but now you are always forced to wear them together. If you were concerned about the tucked-in top coming loose, I’d rather put some discreet snaps or buttons in place to keep the two garments together.
There are also projects to make accessories. I loved the 1940s fascinator even if it’s not something I would really wear. However, I did not really understand some details in the instructions. I think that you are supposed to use a ready fascinator base but what is the pattern for? Is it just that you could check for a size?
I’m not as interested in home sewing part that is the last chapter. However, I have made a lampshade before to fix an old yellowed one, so that is something that people like me do. However, I didn’t use a ready-made kit but just bought the self-adhesive panel and used a lot of glue instead of tape. The results was pretty much the same. Another project that caught my attention was the doily placemat project. I wouldn’t want to have those at my modern home but they would probably look super pretty in a summer cottage.
How to draft the pattern?
It was fairly easy to draft a kimono pattern. I took a few required measurements and started drawing. onto a big piece of tracing paper that I placed over my cutting mat. This helped me quite a bit since my cutting mat has a 1 cm grid that I was able to use to both measure and draw my lines.
I basically drew a big T and then added curves for the neckline and the armpits. The sleeves, the ties and the neck binding were all rectangular pieces.

Cutting and sewing
It wasn’t very easy to keep my shifty polyester satin stable as I was cutting it. However, it was very important to get all the pieces on grain.
My fabric was very thin and frayed easily so I went for French seams. Instead of stitching in the ditch, I finished the neckline binding by slip stitching it in place from the inside. Nowadays I find hand-sewing much more fun than before. I think that it adds a touch of real couture to the simplest of garments. Besides, sewing facings edges from the right side often result in ugly pleats and missed parts of the facing edge. Combined with the trouble of unpicking and restitching, probably take more time than making things by hand.
The finished kimono
I think that the leaf print suits well for the autumn! Even though this has been designed as a dressing gown it’s just a basic kimono that works as well as a replacement for a cardigan. For the photo shoot, I layered it over a pair of leggings and a jersey top. (I say “photo shoot”… My photographer was my 8-year-old daughter! So if the pictures are a bit shaken it’s because the camera was a bit heavy for her.)

Here is the side view:

… and from the back. The back shows one of the belt loops that keep the belt in place.

I might try wearing it with the belt tied back, too.
This was a quick project to make. I still have some of the same satin left and I might end up making another kimono for my daughter. Finally, I could as well draft a kimono pattern for her measurements, too! How cute we would look together!
I have done also more complicated pattern drafting lately. Are you interested in reading about it? Have you ever tried drafting your own patterns?
Thank you for reading and see you soon! Happy Sewing!
Katja


