
Photography tips for a sewist
I have now blogged about my sewing for a few years and when I go back and look at my earlier posts I can see how much better my photos (and text!) are now. I am by no means an expert photographer but I have picked up a few tricks. I thought you might be interested in hearing about them as so many of you share pictures of your wonderful projects online. So here are my best photography tips for a sewist!
Lighting is the number one
Finland in winter is a tough place for a photographer. The days are short and often cloudy and even at noon, the light may not be bright enough for you. The shape of our home doesn’t even allow me to take photos next to a south-facing window. I used to slow down my blogging for the mid-winter because of this but finally decided that it was a time for me to make a small investment. I bought a set of Falcon Eyes studio lights at home.
Even without studio lights, there are things you can do. First, consider taking photos outside or next to a window. Position your camera on a stand or other solid surface to reduce shaking. Use a higher ISO setting and up the exposure a bit. Try not to move since the exposure time will be longer.
Consider using a reflector when taking tabletop pictures. The reflector doesn’t have to be anything fancy. Just prop a piece of white cardstock against a cereal box and your pictures look much better! Try it if you don’t believe me!
Raw image format
If and when you want to edit your photos you will want to make sure that you have saved as much of the image information as possible. This is even more important when taking images in poor lighting conditions. Set your camera to save the images in raw format. The files will be big, mine are about 25 MB each, but you can delete the raw files after editing and saving the pictures in a packaged format such as jpeg. I have an external hard drive for all my images so that my computer hard drive doesn’t get filled with my photos.

I upload all my raw images to Adobe Lightroom which is a great tool for editing photographs. Usually I make some basic adjustments to a single image only and then sync the adjustments to all of my photos. Then I can mark the best photos and go through each of them to make smaller adjustments. When I’m happy I’ll export the images in jpeg format.
Selecting a photography background
Pay some attention to what is behind you when you take photos of your makes. A messy background or one that is full of details can distract from the actual thing you want to show. If you have a white wall to take photos against, that is great. If you are like me and don’t own one you can create a temporary wall by hanging a big fabric (You do have all those fabrics anyway in your stash, haven’t you?) behind you:

I happen to have this little alcove upstairs in front of which I hang my backdrop. I stuck two nails on both sides of the alcove and hung a metal rod between them to hold my fabric roll.
My setup is far from perfect, first of all, it is way too narrow so forcing me to edit the sides to get rid of all that clutter on both sides of the fabric. But then, it is cheap and easy to build, remove and store when I don’t need it.
During the summer, it is a good idea to look for backgrounds in the surrounding areas. It’s interesting what you can find when you start looking. For example, the ugly industrial area nearby offered these amazing backgrounds for my son:


Posing tips for the photos
I must be almost famous for all those deer in the headlights type of photos that have been taken of me during my life. My school photos give the impression that someone had hit me over my head leaving me dazed just seconds before the camera went off! In my first blogging photos, I refused to look directly at the camera because of that reason. However, nowadays I am pretty happy with my photos because I know a few tricks about posing. So, I know what I’m talking about.

So, first I’ll tell what not to do. Do not try to keep your eyes open and a static smile on your face. By doing that, your face becomes unnaturally stiff and your eyes start to water. You have a digital camera (or phone, whatever you use), so one photo in which your eyes are closed is not a disaster. Practice a few smiles in front of the mirror. Try finding out how much you can smile before the smile becomes a grimace.
Next, forget what I just wrote and have fun. Take some really silly photos. Dance in front of the camera. It wasn’t that bad, wasn’t it?
I don’t really like those cool, bored-like looks of some
I struggled with this until my husband gave me a tip that was really great: “Try to read the text at the camera.” So I read, “Sony, Sony, Sony,…” And suddenly I was there, in my photos. I was involved! I looked interested! After doing this for a while I don’t need to read that brand name anymore
Another tip that I know is to say aloud what you want to feel or show. Say: “I made this lovely dress!” As you say it aloud your body reacts to it and the picture shows a woman who is proud and happy to wear a lovely dress she’s made.
The way you stand also has a big effect on the picture. Try not to stand completely straight towards the camera. It is not a natural pose. Tilting your other hip backwards makes you look slimmer and keeping your knees together adds a bit curve to your hips, if you, like me, lack a bit in the curve department or if you just want to have a more feminine pose.
Leaning a bit forward makes you look friendly and attentive and tilting your head looks cute. Try to make sure that your shoulders are back and that your back is straight. A slumped posture does not do any figure justice. Besides, it is just healthy to keep a good posture!
Shooting angles
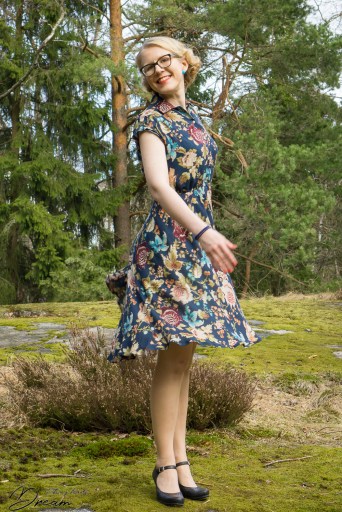
Experiment to find the perfect height for the camera. I often shoot from about my chest height. Generally, shooting from eye-height does not look good, so if you have a friend/husband/daughter/son taking your photos, ask them to crouch a bit. Why? Shooting from above makes you look shorter, your head looks blown and your legs stumped. Not a good look! Whereas taking the photo in a slightly lower angle makes you look taller, slimmer and generally flatters you. Take a look of the two photos below. Which do you think looks better?


The first picture has been taken from slightly below angle and my body looks proportionate. Also, the actual length of the dress hem shows. The latter picture has been taken from the eye level and my legs looks stumped and my head looks too big.
The picture above also shows what happens if you try too hard to stay too still and keep a smile in place. The latter picture was not taken for the blog but for my husband’s 3D-modelling hobby and he asked me to remain completely still while he took several photos from different directions. It’s amazing how my face looks so unnaturally frozen and my smile forced!
Photographing kids

The kids are a wonderful subject but a
Props help a lot. Give toddlers a toy or an interesting object, such a watch, to study. You can make posing a game. “Pretend you are a statue!”

Even if the kids seem shy or stiff the games and your imagination helps. Tell a story and tell them to be the main character. “You are a princess that has found the most beautiful flower!”, “You are a fierce pirate!” “You are an Olympic medalist that has just won her race!” “You are a rabbit!” Not every prompt needs to lead to a perfect picture but they make the whole thing a fun game and helps kids to relax and laugh.
I never force kids for the photos but I am known to offer small bribes. I mean after all that posing they have surely deserved ice-cream! I also give my kids chance to take photos themselves. Some of the best photos in this blog have been taken by my kids!
Tabletop photos
I often want to show details of the different stages of my projects or show-off a small project that is not a garment that I can wear. I could just place the object on the table and snap a photo but that would make a boring picture. It doesn’t take much to make the photo more interesting.
I recommend placing a big piece of cardstock underneath to make a nice matte surface. Then you can add a piece of pretty patterned scrapbooking paper underneath and throw some buttons, a strip of lace or a book to make a livelier picture. I have some silk flowers that you have all seen in many pictures and those are great to block the view to a cluttered background.

The tabletop photos look great if you add a bit of depth by shooting close in the aperture mode. Just make sure that your focus isn’t too small. I tend to use something between f/5 and f/8. See how the background blurs in the image above.
Editing tips
The basic edits I always go through are cropping, adjusting the white balance, exposure, contrast and lighting. I often sharpen pictures slightly and add luminance to reduce noise when there hasn’t been quite enough light. A bit luminance makes also your skin look nicer (a nice side effect)!
I do remove blemishes if I have a bruise on my leg or a pimple on my nose. I don’t want those things to be the ones that the viewer concentrates on. I will remove a strand of thread that has stuck on my skirt or a piece of dirt on my shoe. However, I never edit my body shape or do any massive photoshopping to make my face look completely poreless or my eyes look bigger. That’s where I draw my line.
I struggle often with reflections from my glasses and try to select photos where there are none. Sometimes I manage to remove the worst of the reflections if they are not too severe but often I just have to leave them.
The white background is where my biggest edits happen. As I mentioned above my white backdrop is too narrow and some of the cluttered sides remain after I crop the picture. I don’t like using Photoshop since moving between two applications is slow and clumsy.
A while ago I found a super quick way to make beautiful white backgrounds with using the Adjustment Brush in Lightroom. The Adjustment Brush allows me to brighten the background and it seems to be smart enough not to touch the person in the middle of the picture. This is how I make pictures like this:

I made a little YouTube clip on how to make a background like this for anyone that is interested.
Making a background like this takes less than a minute and unlike many alternative tools, the hair looks still natural since I haven’t cut out anything. Of course, if I really want to play all sorts of strange things can happen:

Here were all my tips that I wanted to share. Do you have good tips of your own? Please share them in the comments! I’d love to hear them!

Thank you for reading and happy sewing!
Katja
Share this:


11 Comments
PsychicSewerKathleen
Thank you so much for this post Katja! It’s the most USEFUL photograph guidance I’ve ever read – I’ve saved it, bookmarked it and will definitely use it in my future photos AND video set ups. I love to see all your sewing projects and appreciate all the work you do to bring your creations to us in a readable and visually appealing format.
kk
Thanks! I’m glad it was useful.
Life of Janine
This is very helpful! My sewing group is presenting a class on photographing your makes with a mobile phone and I will add a link to your blog post in our resources package. Most members of the group are uncomfortable photographing themselves and your fun tips (like speaking to the camera) will probably help them take better pictures.
kk
That’s great! I am so happy if my tips help your sewing buddies!
klaugen
Really good post!
I have recently taken new photos, and I have some lighting problems…my pictures does not get so Clear and Bright as they used to do, because it has been too cold to take pictures outside and I do not have any good lights inside…
Janet
I’d like to try lots of these ideas, especially the different camera settings. One of my aims for this year is work out how to improve my blog photography, so this is really timely. Thank you!
kk
Thank you for your comment! I know I have a lot I could learn about my camera settings, too. I have a fairly new camera and I tend to use the same settings all the time. The more pictures I take the more I learn!
kk
Thanks for the comment! I’m glad if my post can help you at least a bit.
Pingback:
Robert Smith
Superb tips. Learned a lot from here. Thanks
Karen
Thank you so much for sharing what you have learned! I sew and am trying to figure out how to get better pictures. I really like the card stock under a flat lay garment idea. Thanks!